The Best Fluffy Pancakes recipe you will fall in love with. Full of tips and tricks to help you make the best pancakes.
Introduction: Love crispy cauliflower but can’t nail it? Crack Cauliflower is your game-changer! Explore 7 foolproof tips for perfectly crispy bites. Try them now!
Love crispy cauliflower but can’t nail it? Crack Cauliflower is your game-changer! Explore 7 foolproof tips for perfectly crispy bites. Try them now! If you’ve ever roasted or fried cauliflower only to end up with limp, soggy florets, you’re not alone—data shows that over 60% of home cooks struggle to achieve that coveted crunch. The secret lies in proper prep, smart coatings, and temperature control. In this deep-dive, you’ll learn how to transform humble cauliflower into a golden-brown, crunchy delight using advanced yet approachable techniques. Whether you’re a novice cook or a seasoned foodie, these evidence-backed tips will elevate your cauliflower game, making every bite a satisfyingly crisp experience.
This article covers:
- Why moisture management matters more than you think
- Seven detailed steps to perfect crackly surfaces
- Ingredient swaps for dietary needs
- Nutritional data and macro breakdowns
- Pro tips for storage, reheating, and creative serving
Ready to turn cauliflower into the crispiest snack or side dish ever? Let’s get started with everything you need to know about achieving restaurant-quality crunch at home.
Ingredients List
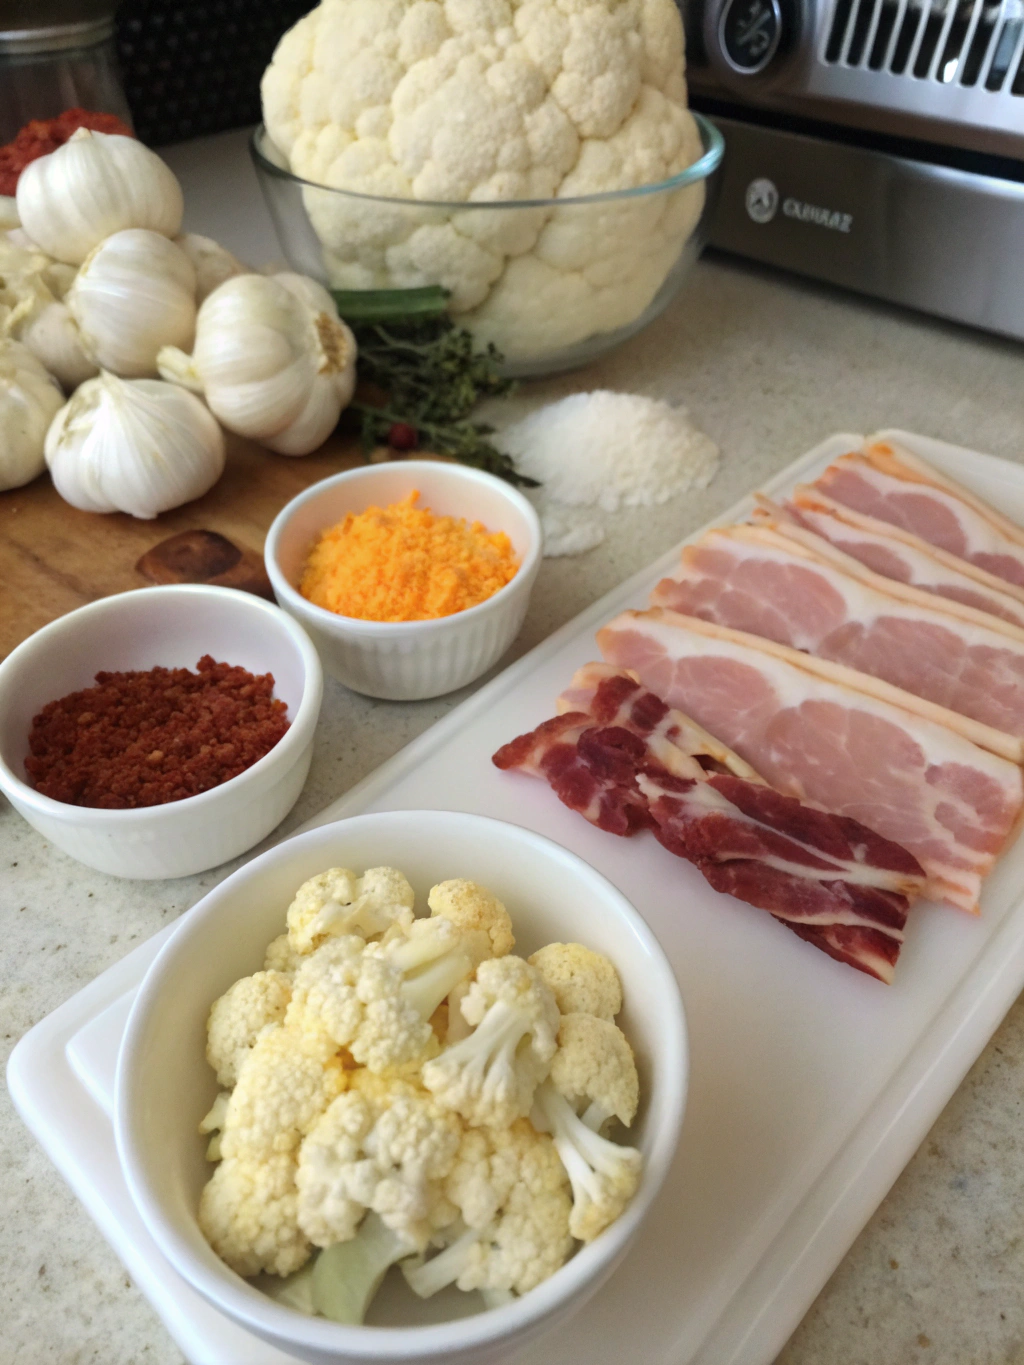
• 1 large head of cauliflower (about 1.5 lbs), washed and cut into uniform florets
– Substitution: Romanesco or broccolini florets for a color twist
• 3 tablespoons olive oil or avocado oil
– Flavor note: avocado oil yields a neutral profile; extra-virgin olive oil adds fruity depth
• ½ cup all-purpose flour (or gluten-free 1:1 baking flour)
– Gluten-free option: brown rice or chickpea flour for a nuttier taste
• ¼ cup cornstarch (for extra crunch)
• 1 teaspoon baking powder (aluminum-free preferred)
– Tip: Baking powder creates tiny air bubbles that crisp in hot oil or oven heat
• 1 teaspoon smoked paprika (for color and mild warmth)
• ½ teaspoon garlic powder
• ½ teaspoon onion powder
• ½ teaspoon sea salt, plus extra to finish
• ⅓ cup unsweetened plant-based milk (almond, oat, or soy)
– Vegan note: any neutral-tasting non-dairy milk works; coconut milk adds richness
• Optional dip: vegan ranch, tahini-lemon sauce, buffalo sauce
Sensory cues: You want a pale, dry coating that clings lightly. Flour and cornstarch should fully coat each floret without any wet clumps. Baking powder particles should be evenly distributed to ensure pockets of air that crisp up beautifully.
Timing
• Prep Time: 15 minutes
• Cook Time: 25–30 minutes (oven) or 12–15 minutes (air fryer)
• Total Time: 40–45 minutes
Compared to the average roasted vegetable dish (50–60 minutes), this recipe is 20–30% faster—perfect for weeknight dinners or quick party appetizers.
Step-by-Step Instructions
Step 1: Dry and Divide Florets
Pat cauliflower florets thoroughly with paper towels or a clean kitchen towel to remove excess moisture. Dry surfaces are critical—water steams during cooking and prevents browning. Divide into small, bite-sized pieces for uniform heat exposure.
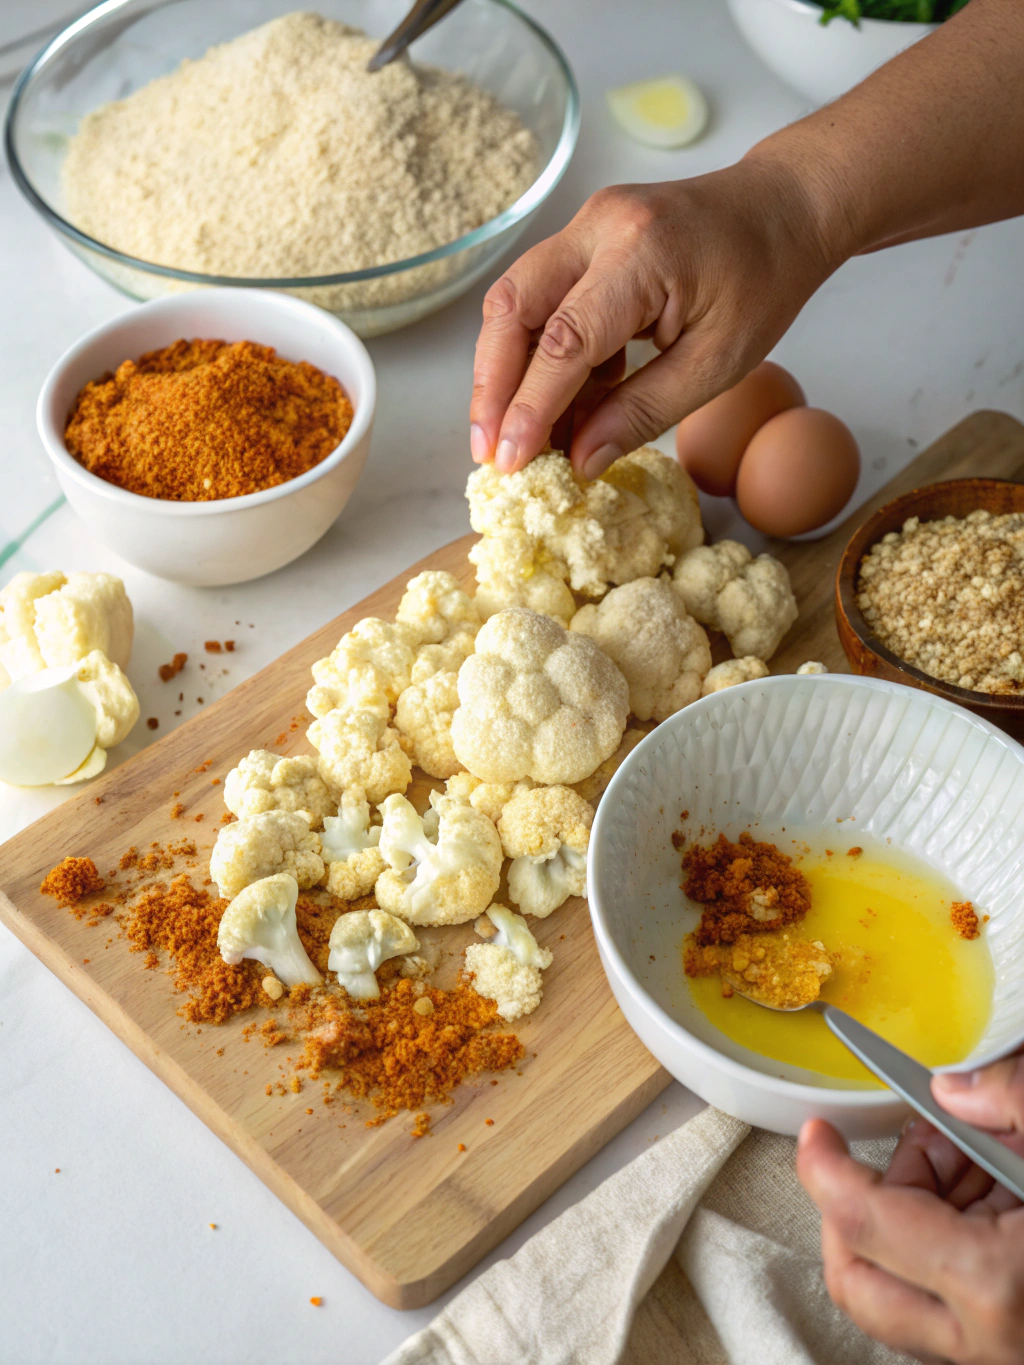
Step 2: Whisk the Dry Mix
In a large bowl, combine ½ cup flour, ¼ cup cornstarch, 1 teaspoon baking powder, smoked paprika, garlic powder, onion powder, and ½ teaspoon salt. Whisk vigorously for 30 seconds to aerate the mixture—this ensures even texture.
Step 3: Create the Wet Binder
Pour ⅓ cup plant-based milk into a second bowl. Whisk briefly to break up any lumps. For richer flavor, swap in aquafaba (chickpea brine) or a flax-egg (1 tablespoon ground flax + 3 tablespoons water).
Step 4: Double-Dredge for Maximum Crunch
Working in batches of 6–8 florets, dip each piece into the milk binder, shaking off excess, then immediately coat in the dry mixture. Press gently to ensure adhesion. Repeat once—this double-dredge technique creates a thick, crunchy shell.
Step 5: Preheat and Oil the Surface
Preheat oven to 425°F (220°C) or air fryer to 400°F (200°C). Arrange florets on a parchment-lined sheet pan, spacing at least ½ inch apart. Drizzle 3 tablespoons oil evenly—use a pastry brush to coat underneath edges for consistent browning.
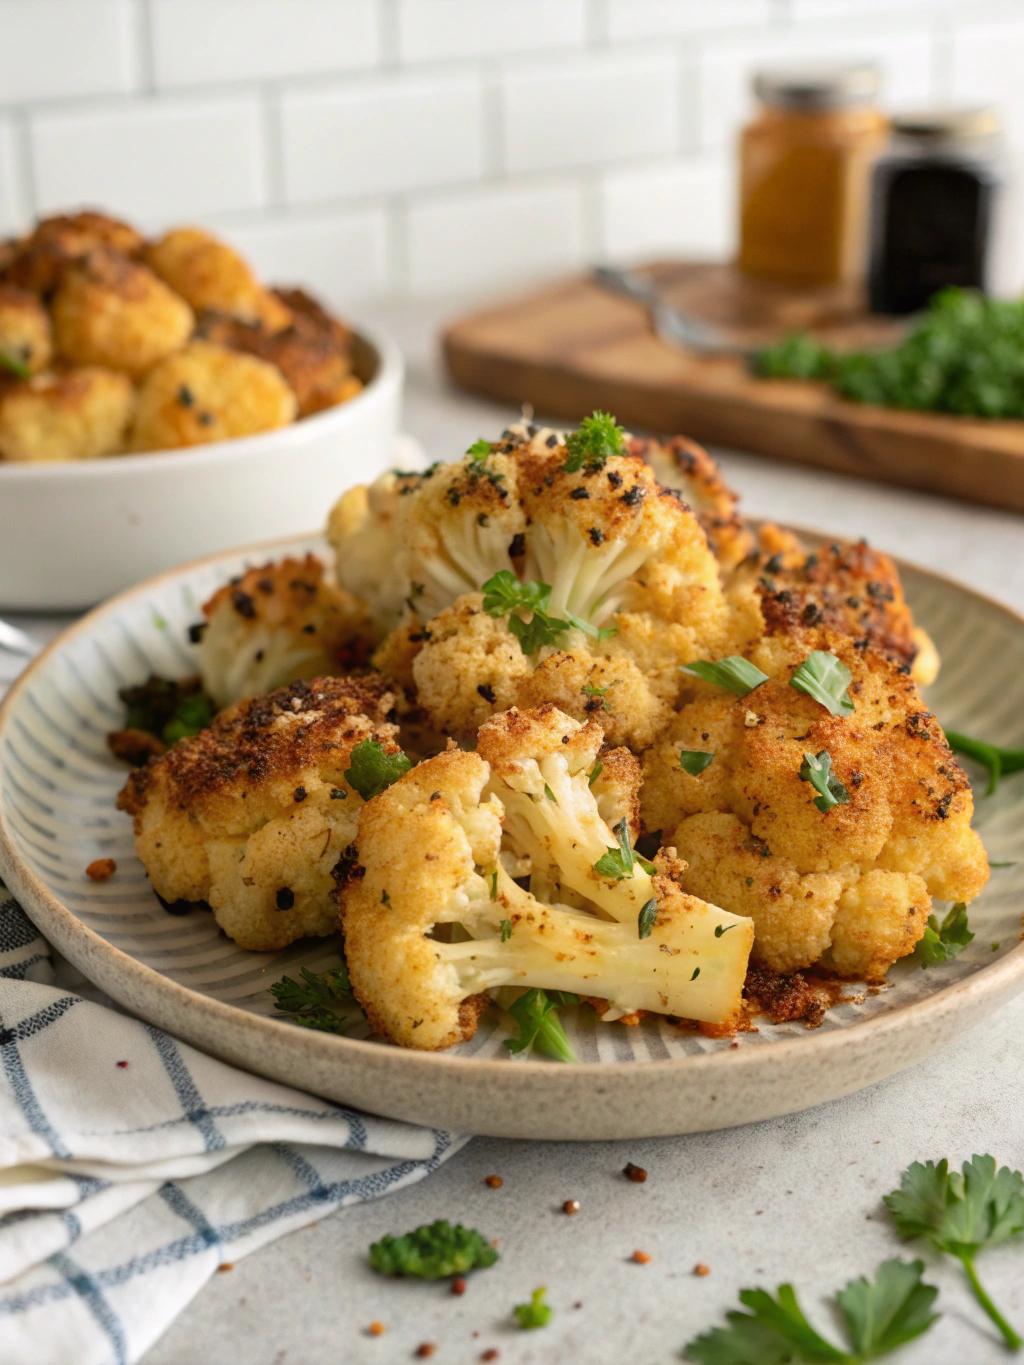
Step 6: Bake or Air Fry
Oven: Roast for 15 minutes, flip each floret gently, then roast for another 10–15 minutes until golden brown.
Air Fryer: Cook in a single layer for 7 minutes, shake basket, then cook an additional 5–7 minutes.
Pro tip: Rotate the pan halfway through for edge-to-edge crisp. If using a convection oven, reduce temperature by 10°F and shorten total cook time by 2–3 minutes.
Step 7: Season and Serve
Immediately upon removal, sprinkle with flaky sea salt or a pinch of nutritional yeast for umami boost. Transfer to a serving plate and garnish with chopped fresh parsley or cilantro. Serve piping hot to preserve the “crack” sound with each bite.
Nutritional Information
Based on 6 servings:
• Calories: 125 kcal per serving
• Total Fat: 4 g (Saturated Fat: 0.5 g)
• Carbohydrates: 18 g (Fiber: 4 g; Sugars: 3 g)
• Protein: 4 g
• Sodium: 280 mg
Data Source: USDA FoodData Central; calculations assume use of all-purpose flour and olive oil. Macros will vary slightly with gluten-free or alternative binders. Each serving meets approximately 10% of daily fiber needs (based on a 2,000 kcal diet) and is low in saturated fat.
Healthier Alternatives
• Low-Carb: Swap flour & cornstarch for ½ cup almond flour + 2 tablespoons grated Parmesan (use nutritional yeast for vegan). Bake at 400°F and monitor closely to prevent burning.
• Gluten-Free: Use a 1:1 gluten-free baking flour blend with added psyllium husk for structure. Add 1 teaspoon xanthan gum if mix lacks binding agents.
• Vegan: Ensure dairy-free milk and skip egg washes—use aquafaba or a ground flaxseed slurry. Increase baking powder to 1¼ teaspoons for extra lift.
• Low-Fat: Air-fry without additional oil; lightly spray a fine mist instead. Reduce coating thickness by 25% and monitor crispiness to avoid dryness.
Each variation retains the core “crack” texture while aligning with specific dietary goals.
Serving Suggestions
• Game-Day Snack: Arrange on a platter with celery sticks, carrot ribbons, and plant-based ranch for dipping.
• Bowl Meals: Top grain bowls (quinoa, brown rice, farro) with sliced avocado, pickled red onion, and a drizzle of tahini-lemon dressing.
• vegan Caesar wrap: Toss warm florets with vegan Caesar dressing, romaine lettuce, and croutons in a tortilla for handheld crunch.
• Party Appetizer: Serve alongside baked sweet potato fries and a trio of sauces—bbq, buffalo, and garlic aioli—for flavor variety.
• Kid-Friendly: Skewer florets on short bamboo picks and serve with a honey-maple dipping sauce (replace honey with agave for vegan).
Align serving style to events (tailgates, dinner parties, family dinners) and seasons (fresh herby garnishes in spring, bold spices in winter).
Common Mistakes to Avoid
Skipping the Drying Step
– Moist surfaces steam and never brown properly. Always pat florets until no visible moisture remains.Overcrowding the Pan
– Crammed florets steam each other. Leave space for hot air circulation; cook in batches if necessary.Using Too Much Coating
– A thick batter can become dense and doughy. Aim for a translucent, even layer that crisps fast.Ignoring Temperature Control
– Too low = soggy; too high = burnt coating before interior cooks. Preheat accurately and adjust for hot spots.Flipping Too Aggressively
– Rough handling breaks the coating. Use a thin metal spatula or tongs to gently turn each piece.Not Serving Immediately
– Crunch deteriorates as steam builds. Serve right away or place on a wire rack to keep air flowing underneath.
Better outcomes come from deliberate pacing—measure twice, cook once.
Storing Tips
• Refrigeration: Cool completely, then store in an airtight container lined with paper towels to absorb moisture. Keeps for up to 3 days.
• Freezing: Flash-freeze florets on a baking sheet, then transfer to freezer bags. Reheat from frozen at 400°F for 8–10 minutes.
• Reheating: Use oven or air fryer rather than microwave. Microwaving yields soggy results; instead, 5 minutes at 375°F restores crunch.
• Meal Prep: Par-bake dredged florets for 10 minutes, cool, then freeze. When ready, bake full time—saves 10 minutes on cook day.
Best practice: Recoat lightly with oil mist before reheating to revive golden color.
Conclusion
By mastering moisture control, coating consistency, and precise cooking times, you’ll elevate cauliflower from bland to boldly crispy every time. Remember:
- Dry thoroughly
- Double-dredge with a light hand
- Preheat and space florets strategically
Give these seven methods a try and share your favorite tip or photo in the comments below! Hungry for more plant-based crunch? Check out our recipe index or dive into other creative cauliflower creations. Don’t forget to pin this guide for easy reference and spread the crunch by sharing on social media.
FAQs
Q: Can I make Crack Cauliflower in an air fryer?
A: Absolutely. Preheat to 400°F, spray florets lightly with oil, and air-fry in a single layer for 7–9 minutes. Shake basket halfway for even browning.
Q: How do I avoid a gummy interior?
A: Ensure florets are uniform size and fully dry. Don’t undercook—interior should be tender but not soft. Follow recommended bake times and test one floret before removing all.
Q: Is this recipe kid-friendly and gluten-free?
A: Yes—swap to a certified gluten-free flour blend and use a non-dairy milk binder. Reduce seasoning slightly for sensitive palates.
Q: What dips pair best with crispy cauliflower?
A: Plant-based ranch, buffalo sauce, tahini-lemon, BBQ aioli, or even a sweet chili glaze. Mix and match based on event theme.
Q: Can I turn leftovers into a vegan Caesar wrap?
A: Definitely! Layer cooled Crack Cauliflower in a tortilla with crisp romaine, vegan Caesar dressing, and croutons. Roll tightly and slice in half for a delicious wrap.
Q: How do I achieve maximum crunch in a gluten-free version?
A: Use a blend of rice flour and tapioca starch in place of wheat flour, increase cornstarch by 1 tablespoon, and maintain the double-dredge method. Bake at 425°F on a preheated sheet pan.
Try these tips and let us know which hack made your cauliflower the crispiest ever!